Tuesday, January 25, 2011

Chapter Five - Day Five: Seeing and Drawing lines

OMG this chapter was like pulling teeth. I know what a bloody lines look like! I felt like I was in kindergarten again and the teacher was explaining it all over again ‘This is a straight line, this is a curved line!’’ I know they said drawing for dummies, but blimey!  So, once again it’s back to the good ole’ pep talk!  ‘’Brenda did warn us that these next few chapters would be tough, she even likened it to eating your vegetables and that if you don’t you can’t have dessert. Stick in there and have a little patience’’

So starting again...Chapter Five, what a great chapter it taught me all about lines, curved ones, angled ones and straight ones, and if you didn’t already know those are the only 3 types of lines you get :). But moving on there was some very interesting information about lines, according to the book they each illustrate different concepts.  Horizontal lines reflect stability, peace and serenity. Vertical lines reflect strength, grandeur and dignity while Diagonal lines offer a sense of movement and power to drawings.

Brenda also points out that it is perfectly acceptable to use a ruler to draw your lines if needed, but does suggest learning to draw them without having to use one, as it offers far more freedom while drawing.
If you want to practice drawing straight lines, mark two dots across form each other on your page and them simply connect them.  Don’t just move your wrist though to draw the line but instead move your elbow to create the continuous flow across the page.

There are a lot of visual exercises in this chapter, that take you through the art of finding the lines between the space, as she calls it. All it is is basically showing you how to go about seeing an object as a simplified outline. Below is an illustrated example of this:


There are two sketchbook excersies in this chapter, the first one is labelled “getting comfortable with lines.’’ This one is really tricky but quite a lot of fun. The objective of this exercise is to draw your subject without looking at where your drawing but rather at what your drawing. You take your paper and type it down so it doesn’t move, find your object you want to draw (make sure it is a simple one) and as your eyes follow the shape of your object so you hand draws the lines.  The purpose is to coordinate your vision with your drawing hand, it is an integral aspect of drawing so definitely worth practicing.  I have added a few pictures that Brenda drew just to show you how experience proves to be something quite amazing.


Project Five: Fragile Melody.   In this project, the aim was to identify the lines of your subject by observing the negative space and visual measuring propositions. In plain english we divided our drawing block into 4 squares and copied the illustrated guide step by step, learning to see where to place the lines within those blocks. And to put it in even easier terms see pictures below.

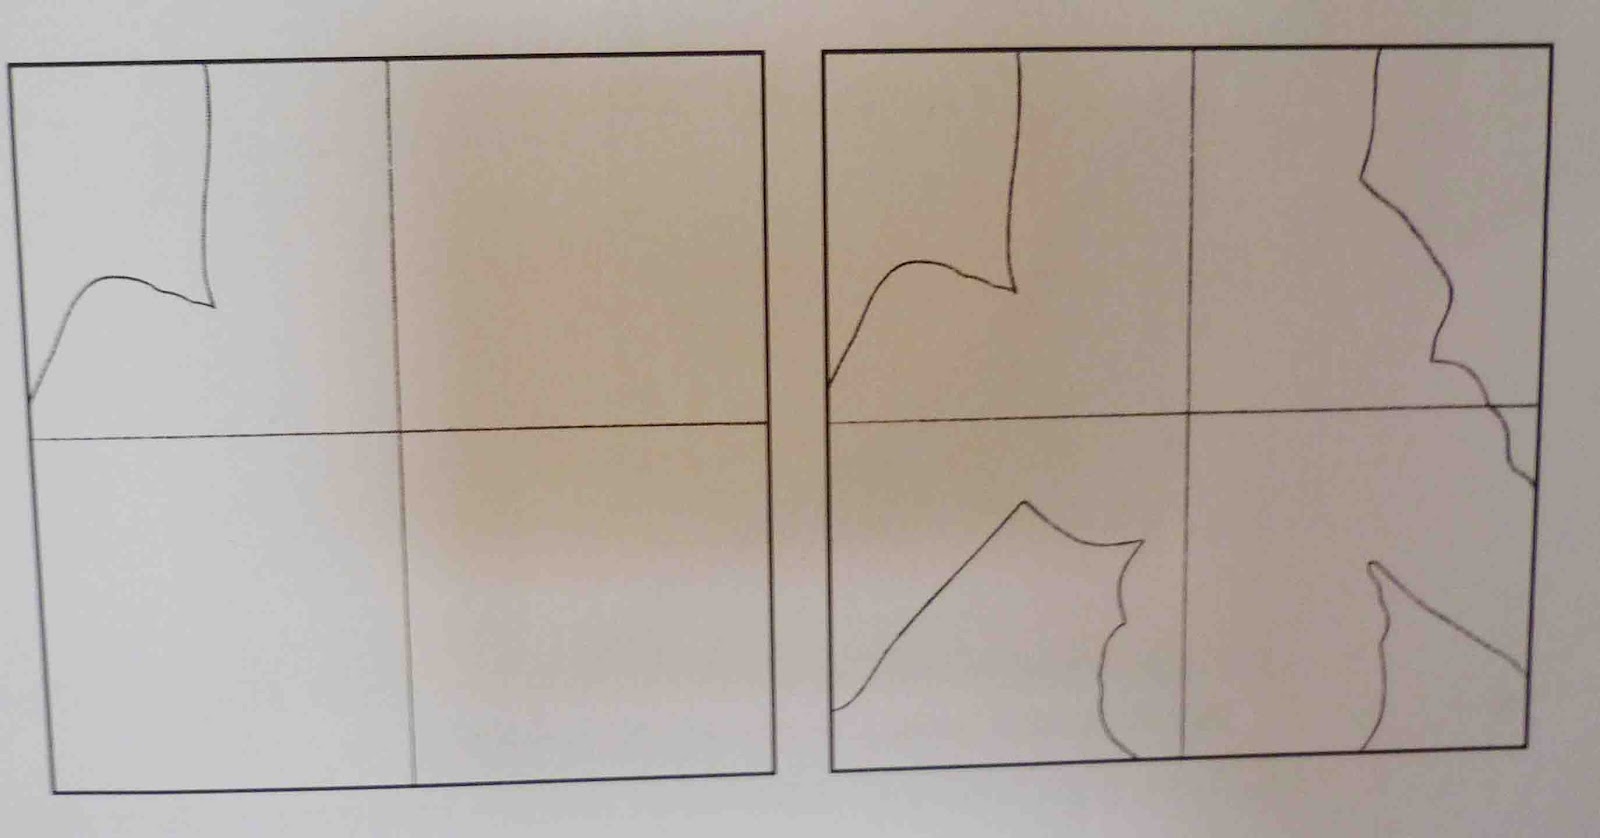
You start off with the picture being upside down
Steps 3 & 4 completes the image
This is my attempt, not to sure whats happening with
the shoulders there.  Better luck next time! 
A tip form the book: Warming up to drawing - by exercising your hand and relaxing your mind, you are able to get into an artistic frame of mind. To do this the book suggests writing your name backwards a few times and doodling.

Next we look at Exploring the Third Dimension with Chapter Six.

(Please note: that photo examples are taken from "Drawing for Dummies by Brenda Hoddinott'' and the  above views are not representative of her and are purely based on a 3rd party view being Me! All snippets taken directly from the book are stated as been so) 

Wednesday, January 19, 2011

Chapter Four - Day Four: Seeing as an Artist

Welcome to Day four. 
As I mentioned before, chapter four marks the beginning of Part Two of the book ‘Exercising the Basic Skills’. Basically the next few chapters, will take me through the basics which are very important. Although they might seem somewhat mundane they will be the foundation of my new drawing abilities. So the more they are practiced the more solid my foundation will be.

'Seeing like a Artist', takes you through the differences between your right and left hand sides of the brain and highlights how you need both to draw. With most people it is the left hand side of the brain that dominates their way of thinking, as it is the side that is used most often in our day to day lives.
There is a visual exercise in the book that I have included below to help you understand the concept of waking up your right hand side. If you look at the image you’ll see either two faces or a vase. So according to the book at the moment when you see the second image your brain has flipped sides.  I find it quite hard, I immediately see the two faces but then to see the vase takes a bit of practise.


Another technique used is by splitting the image down the middle and viewing one half of the page and then the whole image again, you force your right hand side of the brain to see the symmetry in the image both in the vase and the boy’s faces.

The next piece in the book is called ‘giving your left brain a vacation’. According to the book your left brain is what identifies objects and immediately labels them, by viewing the world upside down your left side can no longer identify common shapes and that is when your right hand side steps in - that is the just of it anyway.  So in order to put this theory into practice my next step was to draw the following pair of lips but as seen from upside down.  This allows you to use your right side of the brain and just concentrate on the lines rather than on what it actually is. Plus you have to work asymmetrically as well, which let me tell you is not easy.


We then move onto ‘Exploring your world as a Artist’.  If you can see everything around you as been a potential subject to draw, your choices will be endless.  The book suggests we take a look around our homes and gardens to try find potential subjects to draw.   So after a stroll and some staring into the distance with my coffee, I catch a wake up and turn the page.

Onto doodling! Doodling is apparently very good for you as it activates your brain and does wonders for you creatively. Armed with this information, any future boss is in for an argument!
On to project 4 and as you guessed is all about doodles. In this project though, you are taken through all the stages of seeing like an artist. It’s really very clever.

First you doodle - Check.
This as you know helps stimulate your creative juices.
Next you need to see beyond the lines and visualize - Check.
Here you need to see how many shapes and objects you can find in your doodle. You must turn your page around and see the doodle from all angles. This activates your discovering juices (for lack of a better word), you must colour in your shapes in different colours to help identify them for the next step.
The last step is there to let you practice your drawing again, as she says every time you draw you improve. But it also helps you realize all subject matters, no matter how complex, all start with a few simple lines.

Step One
Step Two
Drawings of  what I saw in my doodle
Next round Chapter 5 'Seeing and Drawing lines', sounds easy enough.  Till then.

(Please note: that photo examples are taken from "Drawing for Dummies by Brenda Hoddinott'' and the  above views are not representative of her and are purely based on a 3rd party view being Me! All snippets taken directly from the book are stated as been so) 

Sunday, January 16, 2011

Chapter Three - Day Three: Navigating your Drawing Journey

This chapter starts by cover the simplicity of drawing and shows you how to go about seeing objects as simplified lines or shapes.  This is how we draw when we’re kids, a house is a simple square with a triangle on top, a tree is made up of a circle and rectangle. Being able to see objects like this is a gift and will take a bit of practice if you are not use to it.

The book recommends treating yourself to a simple colouring in book. This will help you in seeing what simplified objects look like, but also demonstrates how even the most simplified object is a recognizable shape.  Once I’ve tried to draw a few simplified objects such as a tree, a house or a mug etc the book briefly covers shading and textures as a subject.

I won’t write to much about this, as it is not very detailed and just basically shows how shading and texture add a 3D element to your final drawings.  Both texture and shading are covered in detail a little further on in the book.

So on to Project 3: Sammy and Samantha. This project gives you a brief overview of everything covered in the chapter, lines, shapes and even texture. It’s a cute rough drawing of 2 twins, very simple in terms of the facial features as we’re still on the squares and circle stage of drawing, but the curly hair helps in understanding how to make texture work in a drawing.

She calls this kind of effect a “Squirkel’ a mixture between a circle and a squiggle and it works great! Just start drawing little circles and then move off as if you where doing a squiggle - and Wa-la a squirkel! Brilliant - I think that’s the first head of hair I have ever drawn.

So next it’s onto Chapter 4 but also part 2 of the book ‘‘Exercising the Basic Skills’’

Just as a final note, the author Brenda Hoddinott, recommends that you keep most/ if not all your drawings dated and signed, to help show you how your skills are progressing.  Even if you don't like them keep them, always respect your origin and your progress but most of all enjoy the journey.

Sammy and Samantha
Meet my Sam, a little out of proportion
but a Sam none the less.
(Please note: that photo examples are taken from "Drawing for Dummies by Brenda Hoddinott'' and the  above views are not representative of her and are purely based on a 3rd party view being Me! All snippets taken directly from the book are stated as been so) 

Thursday, January 13, 2011

Chapter Two - Day Two: Nurturing the Artist within Me

Ok so here starts the serious stuff. In chapter two we cover topics like drawing preferences. These are influenced by all sorts of things like personal philosophies and perceptions, the mediums I chose to work in and... how I hold my pencil?  Again the article takes us through detailed illustrated guides that show me the difference in the types of mediums you can use and detailed sketches on how to hold my pencil correctly. The new pencil grips are a little strange but I’m assured a little practice will make it feel natural in no time.

Next we move on to how to set up a creative corner to work in and how to go about scheduling drawing time.  This has to be your number one priority to put you in the lead while trying to learn to draw. The art of drawing is half skill and half determination. So with my little corner set up in the dinning room, a lever arch file to prop my sketchpad up, appropriate lighting and of course my Ipod, I think I'm finally ready! According to the book music helps block out distractions and allows you to concentrate on the drawing at hand, so nows a great time to invest in an Ipod and a good set of speakers.

Next we move on to finding time for drawing, and it’s suggested that you diarize it as you would any other important appointments. So far so good, got my space and my schedule. Next I’m off to the shops to buy a few supplies that are needed in order to start, these are just the necessities so no need to spend loads setting yourself up. I got everything for R 78, roughly about £ 7 or $ 11, keeping in mind I did have a few supplies already namely the sketch pad and pencil set.

The necessities are, a sketchbook (Acid-free very NB), Pencils (at least a 2H, HB, 2B, 4B & 6B), a mechanical pencil or two with 0.2 and 0.7 lead, Erasers (your normal white one, and then 2 kneaded erasers - 1 for pencil & 1 for charcoal) I’m told prestic/blue tack can also work, a pencil sharpener, a ruler (preferably metal - they are easier to clean) and lastly charcoal (charcoal pencils and sticks).  She does go on to list a few more items under what she calls the wish list, these are things like coloured pencils, chalk pastels etc I’m not even going to venture there yet until I have the basics sorted.

Finally...after all that I’m at the next drawing project: Project 2: The pupil of Iris.
I completed this in about 4 seconds after colouring in like a 4 year old, the only advantage I had is that I’ve learnt to stay in between the lines!

PATIENCE!

I take a deep breath and try again, trying to use more controlled movements. I had a vague flash back of someone telling me you could shade either using small short strokes, tiny circles or a cross-hatch effect - I try all three. Much better. I will warn you now though I do have many a flash back of someone telling me something apparently useful and true. I take no responsibility for the validity of these fun filled ‘‘facts’’ or even weather anyone even told anything :)

So with Chapter 2 complete and still feeling good; apart from my minor toddler set-back (I have had a chat with myself about patience once again)
I think I’m ready for the next one!
My 4 year old madness
My second attempt at shading using the 3 different techniques
How it should be done! 
(Please note: that photo examples are taken from "Drawing for Dummies by Brenda Hoddinott'' and the  above views are not representative of her and are purely based on a 3rd party view being Me! All snippets taken directly from the book are stated as been so) 

Wednesday, January 12, 2011

Chapter One - Day One: Discovering the joys of drawing

Day one and I’m ready.
I enthusiastically grab my pencils and an old sketch pad that I found tucked away in my moms portfolio. The pencils I have, are a set of artist graphic pencils I bought about a year ago, that go from an F to 9B. I’m assuming that should just about cover it?  The first couple of pages just cover the basics of the book, how to work through it, what the little icons on the sides of the pages mean and so on. At the moment my pencil is burning a hole in my hand, but I said I would practice patience - so fine print I heart you!

One of the things that sticks out, is that a foolish assumption would be to think you need to draw fairly well to in order to take up drawing... Well good! because I’m about at stickman level and need to step this up a notch! Being in the creative industry and not been able to draw doesn't always put me in the drivers seat, so here goes...show me how to draw!

I continue to read discovering the joys of Drawing! Wonderful, I’m reassured on every page, told that I will have a unique style that I’m to embrace and that there is no right or wrong way! Perfect, why have I waited so long to find my inner Picasso!  I’m encouraged to experiment with new media and styles all the time and to constantly challenge myself. This all sounds great and I’m totally revved - turn over the page and WHAM project 1: Wooly Woo.

Wooly Who? Apparently you cant make a mistake with this and I quote “Dust Bunny” So pencils up, HB and 6B are what are needed for this project. There is great step by step illustrated and worded guide to work through. Very simple and easy.

At the end of drawing my Wooly Woo, I’m told to date it and sign it. One big fat pat on my back, not quite like the book but maybe perhaps as the book suggests a very distant cousin!  Job done!
The verdict: simple and easy to follow instruction with lots of encouragement. I think I can feel my little artist growing inside of me. Bring on Day two.

Below is physical evidence of the Wooly Woo:
Books version of  Wooly Woo
His distant cousin Wooly What
(Please note: that photo examples are taken from "Drawing for Dummies by Brenda Hoddinott'' and the  above views are not representative of her and are purely based on a 3rd party view being Me! All snippets taken directly from the book are stated as been so) 

Monday, January 10, 2011

Welcome to The Creative Anything Blog!


A couple of months ago I wrote an article on the importance of a creative outlet especially when you are in the creative field. Sounds odd I know, but I’ve posted it below so you could get a better understanding of where I’m coming from.  It reads as follows:

''The importance of a creative outlet.


Finding a creative outlet is more than just a 21st century must have, it’s a life saver for any creative in the full time creative industry. I’m not talking about the guys who get to create mind blowing totally alternative solutions to high end-bespoke customers. I’m talking about the rest of us, that need to deliver for the sometimes conservative corporate. The place where budgets are top of the ‘to talk about’ lists, where ‘lets not re-invent the wheel’ are regular agreeing points in conversations, a place where individuality and uniques-ness refer to solutions and not ideas.


Great ideas are seldom born in the confides of white walls and 24” LED superiority. Great ideas like great stories, come from experiences. So sitting around your computer all day and all night is not going to give you anything great. The great things you’ll see are from other people out there creating the news. I was once told, that I should do something I had never done before at least once a week and that has been some of the best advice I have ever received.


Now among all our deadlines and timescales, I can hear you sighing ‘When would I actually have time for that?’ The trick and means to your sanity is to create that time. These new experiences you are going to fling yourself whole heartedly into, can be enjoyed with anyone. If your a family person, take them with, I’m sure the kids and your partner will be only to pleased to be able to experience life outside of the normality of their week. If you don’t need to think about family, then what are you waiting for!


Finding a creative outlet thats different from your daily creative work is essential to expanding your ideas and stretching your boundaries. Creative outlets do wonders in bringing down stress levels, freeing you to think wildly and imaginatively.  Finding that sole creative outlet, means experiencing them all. You’ll never know until you try it, maybe finding the perfect melody on the didgeridoo, opens the door to your creative hub.


So my advice to everyone is; to go out there and create news instead of just following the links to the next best thing.''


Go forward a few months and here I am sitting in front of my PC creating my first blog! It's all very exciting.  So to follow on with my theme of creative outlets, I've decided to take the plunge and start experimenting with new ideas and projects.


Which brings me to the second part of my first blog...

Ok so here goes...for years I’ve been wanting to reign in my drawing dreams and challenge myself to finally learn how to draw.  Although I took art in school it was never something I mastered in, patience seemed to be something that avoided me at all costs! I’m hoping that been a little older I might have gained a few years experience in patience and can give drawing another chance.

So I went out and bought the book “Drawing for Dummies’’ by Brenda Hoddinott.  It tells me that ‘I can draw!’ and that if I’m a beginner I simply need to follows this book chapter by chapter to learn all I need to about drawing!  So wanting to take the challenge and see if a book can teach someone to draw, I’m going to attempt to release my inner Van Gogh and learn how to draw with 24 Chapters in 24 Days!

Each day I complete my chapter, I will be blogging about everything I have learnt, any challenges I came across and just how easy it is or not, to learn to draw!  Hopefully anyone who ever wanted to learn to draw can now get a little advice, see the challenge isn’t that daunting and attempt to find their inner artist. So in the words of Einstein, ‘Creativity is contagious. Pass it on.’’  here's to creative outlets!