Thursday, February 24, 2011

Chapter Nine - Day Ten: Investigating Fresh Perspectives

I must tell you that perspective was never my strong point, I think I likened it to maths and as soon as you mention maths my brian switches off! So to find this chapter no less daunting than all the rest was a relief to say the least, to be honest shading and textures was far more complex.

There are a few terms you need to know, like geometric perspective (sometimes called linear perspective) this is the effect that shows the subject(s) appearing smaller the further away they are from you. Horizon Line, this is the imaginary line that divides your vision when you look straight ahead, where the earth and sky meet. Perspective Lines, are straight lines drawn at an angle from the edge of the objects, back into perceived distant space until the finally converge at a point on the horizon line (this was taken straight out the book as I have no other way of trying to explain it to you),  these lines act as guides to help draw objects in proper perspective. Lastly is the vanishing point, again taken directly from the book, the point on the horizon line where the angular perspective lines of an object visually continue past it’s edges and eventually converge. Shoo... Hanging in there? Don't worry it will all make sense in a moment when you see the pictures.

 Next we begin to understand that as the drawer you control the eye level view of the viewer. By changing the horizon line you change the perspective of your drawing, change weather the objects are seen from above, below, or at eye level. Below are pictures that Brenda has drawn to demonstrates this.
Objects seen from below and above
Objects seen at eye level view
Finding and using correct vanishing points is really important, as it’s this that makes your image appear more 3 dimensional and visually correct. By using these lines the perspective of your object, as it decrease into the distance, will be perspectively correct. Below is the books example on how to go about finding the vanishing point in a picture.

Take you picture and draw the lines you see
Then extend those lines until they all converge and this will be your vanishing point
There are tips and tricks to remember, that will help when trying to get the perspective in your drawing right, for example: Size differences - objects appear smaller the further away they are.  Overlapping - this helps create depth and Arrangement - depending on where you draw your horizon line you will know where to place your objects i.e a higher horizon line means the objects in your foreground will be ‘’below’’ you, as shown in the pictures above.

Other factors to take into consideration are atmospheric perspective (aka - aerial perspective) this effect makes the object in your pictures appear lighter and faded as they disappear into the distance and lastly we have foreshortening, this is described as follows: ‘’As the angle of viewing becomes more extreme, visual distortion becomes more pronounced.''  Below is an image that demonstrates this, but you must assume that all the bars are of equal length:

Objects seen straight on will visual distort
On to Project 9: Drawing One and Two point perspectives: One point perspective demonstrates perspective seen from one side i.e the side of a building whereas two point perspecxtive demonstrates how to draw perspective when an object’s corner is closer to you than it’s sides.  Below is Brenda's image that portrays two point perspective and my image that portrays both one and two point perspectives.


I hope you didn't find this section to confusing, I think perspective is something that you will need to practise and read about a few times before it finally sinks in and makes sense, at least that's how I feel.  Hopefully the above made a little sense and has helped in bridging a few gaps.  Next we start Part 3 of the book - Time to start drawing! Can’t wait.

(Please note: that photo examples are taken from "Drawing for Dummies by Brenda Hoddinott'' and the  above views are not representative of her and are purely based on a 3rd party view being Me! All snippets taken directly from the book are stated as been so) 

Friday, February 18, 2011

Chapter Eight - Day Eight and Nine: Identifying and Rendering textures

Ok so finally I have had a chance to get back to my drawing book, by resorting to getting up at 5:30 in the morning and drawing for an hour, it seems to be the only time I now have. But I don’t mind the book did say I would have to make an effort.

So on to chapter 8. This chapter took me two days to complete, texture as a subject is pretty detailed but as a drawing... I will let you be the judge of that once you start.   The book covers topics like textures verse patterns, identifying your textures i.e rough, smooth, shiny etc. For Instance to help in creating a wet effect, like a cats eye, you would use pronounced highlights, same goes for shiny objets whereas dull or matte objects would have no highlights.

For each texture there is a different shading technique; Hatching is used for hair or furs, calm bodies of water, jagged rocks and mountains, bark on tress and wood.  Crosshatching is for smooth matte surfaces, woven and shiny fabrics, glistening surfaces, flower petals, polished stones and smooth rocks, human skin and shiny metal. Squirkles (as mentioned before is a cross between a squiggle and a circle) are for furry fabrics, curly hair, masses of leaves on trees (never saw that one coming) as well as ground foliage, bushes or beard stubble on a man’s face. These are merely suggestions though, you are encouraged to find techniques that best suit you and your style.  I have posted some pictures below so you can see the effect of the different sketching techniques in action.


Next it’s on to planning your textured drawing. Use both vision and knowledge and if you can your sense of touch to identify with your subject. Once that’s out the way, look for lines, examine highlights and shadows and lastly look for shapes and forms created by light and dark values. So now that those points are fresh in your mind we move onto the first exercise. Take any object, a basic one though, map out the highlights and dark or light values.  Now start with shading your light values first and then your dark values (that might explain a little, think I started with my mediums first) and just practice drawing the texture of your object.

Next, we move on to project 8: Two Fun Textures - The project is divided into two parts.  Part One: Sketching with Squirkles.  Draw your box, and start squirkling, creating an effect that goes from light to dark. Simply enough...

Now for Part 2: Drawing furry spots. Using your HB pencil, draw your box and mark out where your spots are going to go. Now with your 2H pencil drawing hatching lines in all the areas where there aren’t spots, then using your 2B, 4B or 6B draw hatching lines in the spotted areas. Graduating your shading from light to dark - left to right and bam -  Textures made easy!


After this though I am afraid the fun might stop a little, Chapter Nine concentrates on perspective!
We will have to see how this one goes.

(Please note: that photo examples are taken from "Drawing for Dummies by Brenda Hoddinott'' and the  above views are not representative of her and are purely based on a 3rd party view being Me! All snippets taken directly from the book are stated as been so) 

Friday, February 4, 2011

Chapter Seven - Day Seven: Adding life with Shading

I found chapter 7 full of great exercises, they all focused around shading which was very useful as it gave me a better understanding and more confidence.  You start with hatching lines , these are 45 degree angled lines, used for shading. What influences your hatching lines like all sketching, is the type of medium used, how close the lines are to each other and of course how hard you press.  I found that I just about stab my pencil through the page when I draw, so by practicing the simple exercises in the book I managed to control this a bit.  Below is one of the exercises I used to practice this technique, for your first squares you shade using a 2H, the next three a 2B and the last two a 6B.

Moving on from that, came more practice, with this exercise you learn to blend your different strengths of shading in (see image below), sounds easy but I really struggled to blend my 2H in with my 2B. This was all because of the pressure I was using, if you want a darker shade use a darker pencil! In this exercise you take your 2H, 2B and 6B and start blending.

Once you’ve practiced the above Brenda introduces you to crosshatching (so I wasn’t telling porkies when I said I had heard somewhere someone telling me about the following - always good to know) Crosshatching is very similar to hatching except for the fact you cross over the first set of lines with a second set going in the opposite direction.


Like a said this chapter is full of exercises, really important was at that, the next step is seeing how being able to manipulate your shading techniques opens up a whole new world of textures. This again is an exercise worth practicing, and below I have attached a photo of Brenda’s examples.

An important tip mentioned in the book, is that when you start your shading always start with your lightest values first, then your mediums and lastly your darks. This helps to create smooth blending, in which the dark layers are drawn on top of the medium layers and highlights can be left white.

Project 7: Drawing a Mug: The process of this project goes something like this; step one: draw your mug, step: two identify where your light source is coming from. Form here you start to shade starting with the lightest all the way through to the darkest. Then erase the following sections to create highlights A, B, C, D (see Brenda’s Mug below) and presto your first properly shaded mug.

I must admit I felt much more confident, after this chapter, and I think it shows in my drawing, still not a masterpiece but definitely getting closer to one.  Next in Chapter 8 we cover textures, looks hard but a good challenge.


(Please note: that photo examples are taken from "Drawing for Dummies by Brenda Hoddinott'' and the  above views are not representative of her and are purely based on a 3rd party view being Me! All snippets taken directly from the book are stated as been so) 


Wednesday, February 2, 2011

Chapter Six - Day Six: Exploring the third Dimension

This chapter was all about the light source that helps bring your picture to life. Values are the different shades or grey between black and white and it’s these values that make drawings stand out, but also it’s these values you need to teach yourself to see.

This chapter focused on seeing the light source, every image will have a main light source that creates the shadows and highlights, before you start drawing your subject always make a note of where this is. Once you have your light source ask your self the following, where are the light values, dark values and cast shadow.

Finding these at first can be tricky, especially when working in colour, but the book suggests that squinting at your subject will help in determining where the light sources are sitting. Another tip from the book is to always remember the reflected light that bounces back onto the subject form the surface. Below is a picture Brenda drew to demonstrate this.


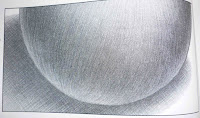
As I moved onto project 6: Drawing a sphere, I must admit that I found this excersies very frustrating because before this point you know nothing about shading and to be thrown into the deep end was a bit overwhelming. Only in Chapter 7 do you cover the different shading methods.

My Sphere bowl looking object
Brenda's sphere

(Please note: that photo examples are taken from "Drawing for Dummies by Brenda Hoddinott'' and the  above views are not representative of her and are purely based on a 3rd party view being Me! All snippets taken directly from the book are stated as been so)